Batch systems keeps track of available system resources and takes care of scheduling jobs of multiple users running their tasks simultaneously. It typically organizes submitted jobs into some sort of prioritized queue. The batch system is also used to enforce local system resource usage and job scheduling policies.
HPC2N currently has one cluster which accepts local batch jobs, Kebnekaise. It is running SLURM. It is an Open Source job scheduler, which provides three key functions.
- First, it allocates to users, exclusive or non-exclusive access to resources for some period of time.
- Second, it provides a framework for starting, executing, and monitoring work on a set of allocated nodes (the cluster).
- Third, it manages a queue of pending jobs, in order to distribute work across resources according to policies.
SLURM is designed to handle thousands of nodes in a single cluster, and can sustain throughput of 120,000 jobs per hour.
SLURM commands and information
There are many more commands than the ones we have chosen to look at here, but these are the most commonly used ones. You can find more information on the SLURM homepage: SLURM documentation.
You can run programs either by giving all the commands on the command line or by submitting a job script.
Using a job script is often recommended:
- If you ask for the resources on the command line, you will wait for the program to run before you can use the window again (unless you can send it to the background with &).
- If you use a job script you have an easy record of the commands you used, to reuse or edit for later use.
Go here for description of writing a submit file.
Using salloc, you get an interactive shell to run your jobs in, when your nodes are allocated. Note that you cannot use the window while you wait for - perhaps - a long time before the job starts.
This example asks to allocate 1 node and 4 processors for 1 hour and 30 minutes. When the resources are available, you will get an interactive shell with those resources
Submitting a job script avoids this. While it still may take a long time before the job runs (depending on load on the machine and your projects priority), you can use the window in the meantime and you do not have to sit and be ready to use it when the job start. Remember, if you do it as an interactive job, your allocated run time starts when the job starts.
To run in the interactive allocation created by salloc, you must use srun to start your programs or you will run on the login node.
Serial, OpenMP, MPI, hybrid jobs, GPU jobs - all can be submitted either directly with srun, in an interactive shell started with salloc, or through a job submission file.
srun/sbatch - running programs/jobs
The commands can be used to start multiple tasks on multiple nodes, where each is a separate process executing the same program. By default, SLURM allocates one processor per task, but starts tasks on multiple processors as necessary. You can, however, specify these yourself, and does not have to follow the default.
The command srun waits until there are resources available and the jobs have completed. You must use srun to start jobs within a salloc session.
The command sbatch JOBSCRIPT submits your submit file JOBSCRIPT to the batch system and returns directly.
More information about parameters and job submission files can be found in the section: Slurm submit file design.
Partitions
SLURM uses partitions, which more or less serves the same function as queues in other batch systems.
Kebnekaise has a number of partitions, where batch, skylake, gpu, and largemem are the most important ones:
- batch
- The batch partition is the default and comprises all nodes with 128GB RAM (Broadwell) or 192 GB RAM (Skylake) and no GPUs. The default amount of memory allocated for jobs in this partition is 4500MB per core (Broadwell) or 6800MB per core (Skylake.
- Note Being the default partition means your jobs will run in this partition if you do not state otherwise in your batch script.
- skylake
- The skylake partition contains all the Skylake nodes which does not have GPUs. Use this if you need your job to only run on Skylake nodes.
- gpu
- The gpu partition comprises (almost) all GPU nodes, whether the Broadwell nodes with K80s or the Skylake nodes with V100s. The exception is the AMD nodes with A100s, which are in their own partition.
- Note 1: to use nodes in this partition your project needs to have an allocation on them, as they are considered a separate resource.
- Note 2: you do not need to give any partition in the job script to use the GPU nodes. It is sufficient to ask for GPU nodes with the SLURM command
#SBATCH –gres=gpu:TYPE-OF-CARD:x, where TYPE-OF-CARD is either k80 or v100 and x = 1, 2, or 4 (4 only for the K80 type).
- amd_gpu
- The amd_gpu partition comprises the AMD Zen3 nodes with A100 GPUs.
- Note 1: to use nodes in this partition your project needs to have an allocation on the GPUs, just like for the K80s and V100s, as the GPUs are considered a separate resource.
- Note 2: in order to use the A100 GPU nodes you need to add
#SBATCH -p amd_gpuand#SBATCH –gres=gpu:a100:1 (or gpu:a100:2 if required)to your jobscript. - To make it easier to see which software is installed on the GPU nodes, there is a specific login node which can be used:
kebnekaise-amdor for ThinLinc:kebnekaise-amd-tl.
- amd
- This is the partition for the CPU-only AMD Zen3 node.
- To use this node, add
#SBATCH -p amdto your jobscript.
- largemem
- The largemem partition consists of only the nodes with 3TB RAM. 41666MB per core is the default allocation for jobs in this partition. These nodes are all Broadwell nodes.
- Note 1: to use this partition your projects needs to have an explicit allocation on the large memory nodes, you can check if this is the case or not in SUPR.
- Note 2 that there are only 20 nodes in this partition, so use it only when necessary.
The command to ask for a specific partition in your SLURM submit script is:
where PARTITION is the name of the partition.
Information about the SLURM nodes and partitions can be found using this command:
Topology of the system
The program hwloc-ls is very useful to see the topology of your allocation - which processors you got, where they are placed, how much memory, etc. This can be used to determine the best placement of tasks, or to see if you asked for what you thought you did!
Note that you need to load the hwloc module and prerequisites to use the hwloc-ls command. See how to load it with the ml spider hwloc command.
Example Running hwloc-ls for n tasks on c cpus per task (2 tasks and 2 cpus per task here) on Kebnekaise (regular broadwell node) yields:
$ srun -n 2 -c 2 hwloc-ls
Machine (125GB total)
  NUMANode L#0 (P#0 62GB)
  NUMANode L#1 (P#1 63GB) + Package L#0 + L3 L#0 (35MB)
    L2 L#0 (256KB) + L1d L#0 (32KB) + L1i L#0 (32KB) + Core L#0 + PU L#0 (P#21)
    L2 L#1 (256KB) + L1d L#1 (32KB) + L1i L#1 (32KB) + Core L#1 + PU L#1 (P#22)
    L2 L#2 (256KB) + L1d L#2 (32KB) + L1i L#2 (32KB) + Core L#2 + PU L#2 (P#25)
    L2 L#3 (256KB) + L1d L#3 (32KB) + L1i L#3 (32KB) + Core L#3 + PU L#3 (P#26)
  HostBridge L#0
    PCIBridge
      PCI 14e4:168e
        Net L#0 "ens6f0"
      PCI 14e4:168e
        Net L#1 "ens6f1"
    PCIBridge
      PCI 15b3:1011
        Net L#2 "ib0"
        OpenFabrics L#3 "mlx5_0"
    PCIBridge
      PCI 14e4:1665
        Net L#4 "eno1"
      PCI 14e4:1665
        Net L#5 "eno2"
    PCIBridge
      PCIBridge
        PCIBridge
          PCIBridge
            PCI 102b:0534
    PCI 8086:8d02
      Block(Disk) L#6 "sda"
A few useful environment variables:
- SLURM_JOB_NUM_NODES: the number of nodes you got. Can be usefull for checking if it coincides with what you had expected. Can be used both in an interactive subshell and in a script.
- SLURM_NTASKS: contains the number of task slots allocated.
- SLURM_JOB_ID: contains the id of the current job. This is only available in the interactive shell or during the run. You can use it in your batch script.
Batch system Policies
The batch system policy is fairly simple, and currently states that:
- A job is not allowed to run longer than 7 days (604800 s) regardless of the allocated CPU time.
- A job will start when the resources you have asked for are available (it takes longer to get more cores etc.), and your priority is high enough, compared to others. How high a priority your job has, depends on
- your allocation
- whether or not you, or others using the same project, have run a lot of jobs recently. If you have, then your priority becomes lower.
- The sum of the size (remaining-runtime * number-of-cores) of all running jobs must be less than the monthly allocation.
If you submit a job that takes up more than your monthly allocation (remember running jobs take away from that), then your job will be pending with “Reason=AssociationResourceLimit” or “Reason=AssocMaxCpuMinutesPerJobLimit” until enough running jobs have finished. A job cannot start if it asks for more than your total monthly allocation.
You can see the current priority of your project (and that of others), by running the command sshare and look for the column marked ‘Fairshare’ - that shows your groups current priority.
The fairshare weight decays gradually over 50 days, meaning that jobs older than 50 days does not count towards priority.
Remember
When and if a job starts depends on which resources it is requesting. If a job is asking for, say, 10 nodes and only 8 are currently available, the job will have to wait for resources to free up. Meanwhile, other jobs with lower requirements will be allowed to start as long as they do not affect the starttime of higher priority jobs.
Detailed description of scheduling
The SLURM scheduler divides the job queue in two parts.
- Running jobs. These are the jobs that are currently running.
- Pending jobs. These are the jobs that are being considered for scheduling, or (for policy reasons like rules and limits), are not (yet) being considered for scheduling.
Basically what happens when a job is submitted is this.
- The job is put in the correct part of the queue (pending) according to the policy rules.
- The scheduler checks if any jobs that were previously breaking policy rules, can now be considered for scheduling.
- The scheduler calculates a new priority for all the jobs in the pending part.
- If there are available processor resources the highest priority job(s) will be started.
- If the highest priority job cannot be started for lack of resources, the next job that fits, without changing the predicted startwindow for any higher priority jobs, will be started (so called backfilling).
Calculating priority
When a job is submitted, the SLURM batch scheduler assigns it an initial priority. The priority value will increase while the job is waiting, until the job gets to the head of the queue. This happens as soon as the needed resources are available, provided no jobs with higher priority and matching available resources exists. When a job gets to the head of the queue, and the needed resources are available, the job will be started.
At HPC2N, SLURM assigns job priority based on the Multi-factor Job Priority scheduling. As it is currently set up, only one thing influence job priority:
- Fair-share: the difference between the portion of the computing resource that has been promised and the amount of resources that has been consumed by a group
Weights has been assigned to the above factors in such a way, that fair-share is the dominant factor.
The following formula is used to calculate a job’s priority:
Priority is then calculated as a weighted sum of these.
The fair-share_factor is dependent on several things, mainly:
- Which project account you are running in.
- How much you and other members of your project have been running. This fair share weight decays over 50 days, as mentioned earlier.
You can see the current value of your jobs fairshare factors with this command
and your and your projects current fairshare value
Note: that these values change over time, as you and your project members use resources, others submit jobs, and time passes.
Note: the job will NOT rise in priority just due to sitting in the queue for a long time. No priority is calculated merely due to age of the job.
For more information about how fair-share is calculated in SLURM, please see: http://slurm.schedmd.com/priority_multifactor.html.
Allocation policy on Kebnekaise
The allocation policy on Kebnekaise is somewhat complex, mainly due to the mixture of several types of normal CPUs, several types of GPUs), and the largemem partition as well on Kebnekaise. Thus, Kebnekaise’s allocation policy may need a little extra explanation.
Thin (compute) nodes
The compute nodes, or “thin” nodes, are the standard nodes with 128 GB memory (Broadwell) or 192 GB memory (Skylake), and no GPUs.
In the image below, the Broadwell nodes are used as example. The only difference for the Skylake nodes is that it would say 192G instead of 128G per node.
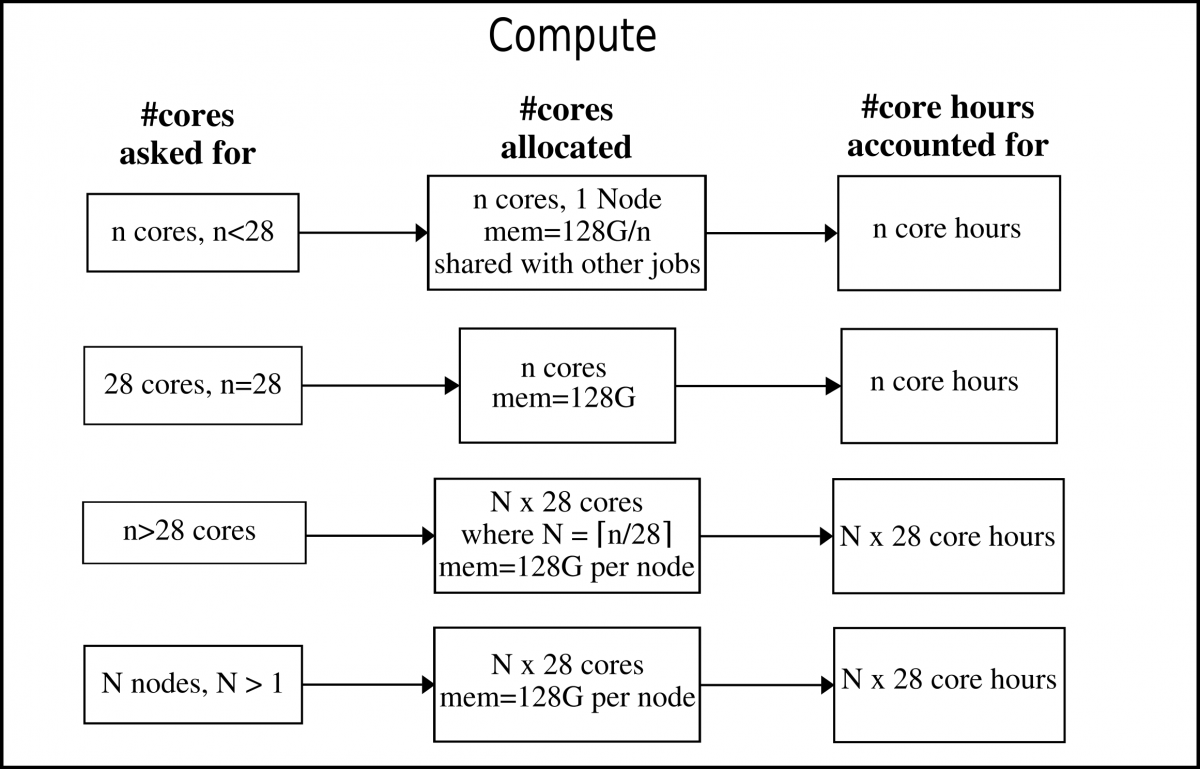
Note: As long as you ask for less than the number of cores than what there are in one node (28 cores), you will only be allocated for that exact number of cores. If you ask for more than 28 cores, you will be allocated whole nodes and accounted for that.
LargeMem nodes
The largemem nodes have 3 TB memory per node. These are all Broadwell nodes.
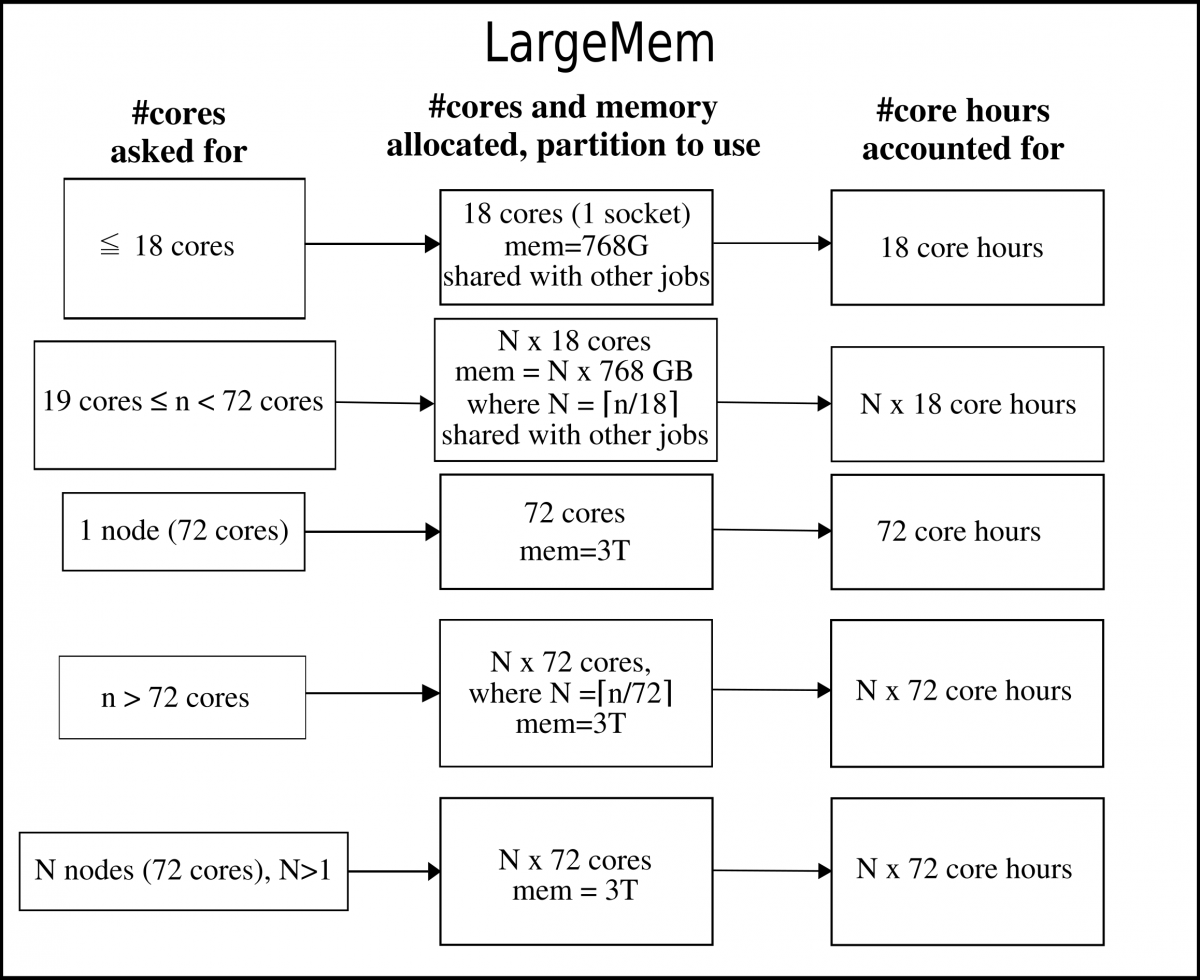
Note: these nodes are not generally available if you have a project on the CPU or GPU nodes, and requires that your projects have an allocation of these. The largemem nodes are considered a separate resource you can apply for in SUPR.
The LargeMem nodes can be allocated per socket or per node.
GPU nodes
There are three major types of GPU nodes: K80s on Broadwell nodes and V100s on Skylake nodes. In addition there are the new AMD Zen3 nodes with A100 GPUs.
For core hour calculations a V100 GPU card is equivalent to a K80 GPU card, ie each core hour on a full card allocates as 2 GPU-hours. The A100 GPU cards are allocated as 6 GPU-hours. Here follows some examples and a more detailed description for both types of GPU nodes.
NOTE: your project need to have time on the GPU nodes to use them, as they are considered a separate resource now. For the K80s and V100s you do not have to add a specific partition in the job script though - you just use the SLURM command
where TYPE-OF-CARD is either k80, v100, or a100 and x = 1, 2, or 4 (4 only for the K80 type). See more in the SLURM GPU Resources section.
For the A100 nodes you also need to add the partition:
K80
When asking for one K80 GPU accelerator card, it means you will get its 2 onboard compute engines (GK210 chips). Most of these GPU nodes have 28 normal cores and 2 K80s (each with 2 compute engines). They are placed together as 14 cores + 1 K80 on a socket. There are also 4 GPU nodes with each 4 K80 GPU accelerator cards.
If someone is using the GPU on a socket, then it is not possible for someone else to use the normal CPU cores of that socket at the same time.
Your project will be accounted for 2 GPU-hours/hour for 1 K80s (2 compute engines).
Note: that if you ask for 3 K80s you will be allocated for 4 K80s!

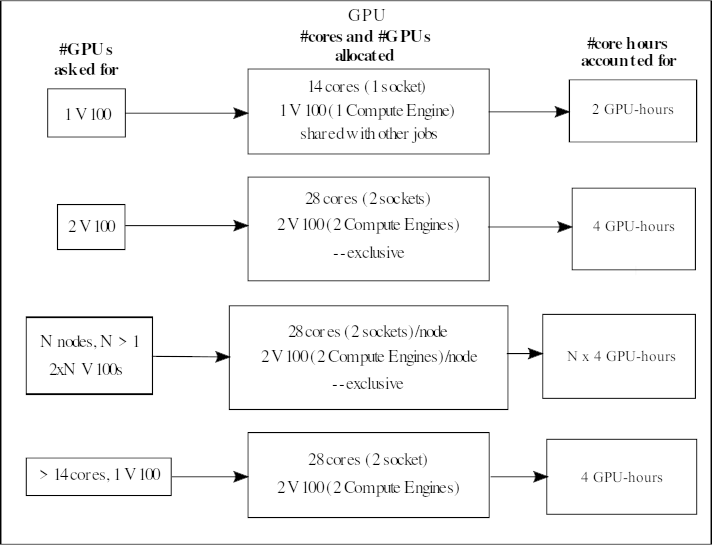
V100
When asking for one V100 GPU accelerator card, it means you will get its 1 onboard compute engine (GV100 chip). These GPU nodes have 28 normal cores and 2 V100s (each with 1 compute engine). They are placed together as 14 cores + 1 V100 on a socket.
If someone is using the GPU on a socket, then it is not possible for someone else to use the normal CPU cores of that socket at the same time.
Your project will be accounted for 2 GPU-hours/hour if you ask for 1 V100.
A100
When asking for one A100 GPU accelerator card, it means you will get its onboard compute engine. These AMD Zen3 nodes have 2 CPUs sockets with 24 cores each, for a total of 48 cores, and 2 NVidia A100 GPUs. They are placed together as 24 cores + 1 A100 on a socket.
If someone is using the GPU on a socket, then it is not possible for someone else to use the normal CPU cores of that socket at the same time.
Your project will be accounted for 6 GPU-hours/hour if you ask for 1 A100.

KNL nodes
The KNL nodes have been decommissioned.
Slurm GPU Resources
NOTE
- Your project needs to have time on the GPU nodes to use them, as they are considered a separate resource now.
- For K80s and V100s you do not have to add a specific partition in the job script - you just use the SLURM command mentioned below.
- For the A100s you need to add a partition with the command to your job script in addition to the below command.
We have three types of GPU cards available on Kebnekaise, NVIDIA Tesla K80 (Kepler), NVIDIA Tesla V100 (Volta), and NVidia A100.
To request GPU resources one has to include a GRES in the submit file. The general format is:
where TYPE-OF-CARD is either k80, v100, or a100 and x = 1, 2, or 4 (4 only for the K80 type).
The K80 enabled nodes contain either two or four K80 cards, each K80 card contains two gpu engines.
The V100 enabled nodes contain two V100 cards each.
The A100 enabled nodes comtain two A100 cards each.
On the dual card nodes one can request either a single card (x = 1) or both (x = 2). For each requested card, a whole CPU socket (14 cores) is also dedicated on the same node. Each card is connected to the PCI-express bus of the corresponding CPU socket.
When requesting two or four K80 cards, one must also use “–exclusive” (this does not apply when requesting V100 cards or A100 cards).
One can activate Nvidia Multi Process Service (MPS), if so required, by using:
If the code that is going to run on the allocated resources expects the gpus to be in exclusive mode (default is shared), this can be selected with “gpuexcl”, like this:
Scripts (Job Submission Files)
The official name for batch scripts in SLURM is Job Submission Files, but here we will use both names interchangeably.
A job submission file can contain any of the commands that you would otherwise issue yourself from the command line. It is, for example possible to both compile and run a program and also to set any necessary environment values (though remember that SLURM exports the environment variables in your shell per default, so you can also just set them all there before submitting the job).
The results from compiling or running your programs can generally be seen after the job has completed, though as SLURM will write to the output file during the run, some results will be available quicker.
Outputs and any errors will per default be placed in the directory you are running from.
Note that this directory should preferrably be placed under the parallel filesystem (your project storage), since your home directory only has 25 MB space.
Both output and errors will, by default, be combined into a file named slurm-JOBID.out. You can send them to other/separate files with these commands:
In the example above, you get files named job.JOBID.err and job.JOBID.out, you can of course give them other names, but if you are running several batch jobs, remember to name them so they are not over-written by later jobs (use the %J environment variable).
A job submission file can either be very simple, with most of the job attributes speciified on the command line, or it may consist of several SLURM directives, comments and executable statements. A SLURM directive provides a way of specifying job attributes in addition to the command line options.
Naming: You can name your script anything, including the suffix. It does not matter. Just name it something that makes sense to you and helps you remember what the script is for. The standard is to name it with a suffix of .sbatch or .sh.
Note that you have to always include #!/bin/bash at the beginning of the script, since bash is the only supported shell. Some things may work under other shells, but not everything.
Example
#!/bin/bash
# The name of the account you are running in, mandatory.
#SBATCH -A hpc2nXXXX-YYY
# Request resources - here for eight MPI tasks
#SBATCH -n 8
# Request runtime for the job (HHH:MM:SS) where 168 hours is the maximum. Here asking for 15 min.
#SBATCH --time=00:15:00
# Set the names for the error and output files
#SBATCH --error=job.%J.err
#SBATCH --output=job.%J.out
# Clear the environment from any previously loaded modules
module purge > /dev/null 2>&1
# Load the module environment suitable for the job - here foss/2021b
module load foss/2021b
# And finally run the job - use srun for MPI jobs, but not for serial jobs
srun ./my_mpi_program
One (or more) # in front of a text line means it is a comment, with the exception of the string #SBATCH. #SBATCH is used to signify a SLURM directive. In order to comment out these, you need to put one more # in front of the #SBATCH.
Note: It is important to use capital letters for #SBATCH. Otherwise the line will be considered a comment, and ignored.
Note that the -A argument is of the form
- hpc2nXXXX-YYY (HPC2N local project)
- NAISSXXXX-YY-ZZZ (NAISS project)
- SNICXXXX-YY-ZZZ (Old SNIC project)
It is a simple conversion from the SUPR project id. You can also find your project account with the command projinfo.
- -N: number of nodes. If this is not given, enough will be allocated to fullfill the requirements of -n and/or -c. A range can be given. If you ask for, say, 1-1, then you will get 1 and only 1 node, no matter what you ask for otherwise. It will also assure that all the processors will be allocated on the same node.
- -n: number of tasks.
- -c: cores per task. Request that a specific number of cores be allocated to each task. This can be useful if the job is multi-threaded and requires more than one core per task for optimal performance. The default is one core per task.
See man sbatch or the section on Job Submit file design for more commands for the script.
- When the job is submitted, the lines of the script file are scanned for directives.
- An initial line in the script that begins with the characters
“#!”will be ignored at this point and scanning will start with the next line. - Scanning will continue until the first executable line, that is a line that is not blank, not a directive line, nor a line whose first non-white space character is
“#”. - If directives occur on subsequent lines, they will be ignored.
- The remainder of the directive line consists of the options to slurm in the same syntax as they appear on the command line.
- The option character is to be preceded with the
“-“character, or“–“in the long form. - If an option is present in both a directive and on the command line, that option and its argument, if any, will be ignored in the directive. The command line takes precedence!
- If an option is present in a directive and not on the command line, that option and its argument, if any, will be processed as if it had occurred on the command line.
There are several examples of SLURM job submission files in a later section.
SLURM Submit File Design
To best use the resources with Slurm you need to have some basic information about the application you want to run.
Slurm will do its best to fit your job into the cluster, but you have to give it some hints of what you want it to do.
The parameters described below can be given directly as arguments to srun and sbatch.
If you don’t give SLURM enough information, it will try to fit your job for best throughput (lowest possible queue time). This approach will not always give the best performance for your job (or, indeed, allow the job to run, in some cases).
To get the best performance, you will need to know the following:
- Your account
- The number of tasks
- The number of cores per task
- The number of tasks per node
- Memory usage
- The run/wallclock time
- The number of nodes
- Number of GPUs needed
Some extra parameters that might be usefull:
For basic examples for different types, see the example section:
- Basic MPI job
- Basic OpenMP job
- Basic MPI + OpenMP job
- Accessing the GPU resources (Kebnekaise)
Some applications may have special needs, in order to get them running at full speed.
Look at the application specific pages (under software for more information about any such special requirements.
Some commonly used programs are listed below.
First line in submit file
The submit file must start with:
This is required for the module system to work. There are other possibilities, but this is the only one we fully support.
Your account (-A)
The account is your project id, this is mandatory.
Example:
You can find your project id by running:
The number of tasks (-n)
The number of tasks is for most usecases the number of processes you want to start. The default value is one (1).
An example could be the number of MPI tasks or the number of serial programs you want to start.
Example:
The number of cores per task (-c)
If your application is multi threaded (OpenMP/…) this number indicates the number of cores each task can use.
The default value is one (1).
Example:
On Kebnekaise the number of cores depend on which type of nodes you are running. Generally, the nodes have 28 cores, except for the largemem nodes which have 72 cores. For more information, see the Kebnekaise hardware page.
The number of tasks per node (–ntasks-per-node)
If your application requires more than the maximum number of available cores in one node (28 for most nodes on kebnekaise) it might be wise to set the number of tasks per node, depending on your job. This is the (minimum) number of tasks allocated per node.
Remember
(The number of cores) = (the number of tasks) x (the number of cores per task).
There are 28 cores per node on Kebnekaise, so this is the maximum number of tasks per node for that system.
If you don’t set this option, Slurm will try to spread the task(s) over as few available nodes as possible. This can result in a job with 22 tasks on one node, and 6 on another, for a 28 task job (since Kebnekaise has 28 cores on a regular Broadwell/Skylake node).
If you let slurm spread your job it is more likely to start faster, but the performance of the job might be hurting. If you are using more than 28 cores (regular broadwell/skylake node on kebnekaise) and are unsure of how your application behaves, it is probably a good thing to put an even spread over the number of required nodes.
There is no need to tell slurm how many nodes that your job needs. It will do the math.
Example:
Memory usage
| RAM per core | |
|---|---|
| Kebnekaise (broadwell) | 4450 MB |
| Kebnekaise (skylake) | 6750 MB |
| Kebnekaise largemem | 41666 MB |
Each core has a limited amount of memory available. If your job requires more memory than the default, you can allocate more cores for your task with (-c).
If, for instance, you need 7000MB/task on a Kebnekaise broadwell node, set “-c 2”.
Example:
This will allocate two (2) cores with 4450MB each. If your code is not multi-threaded (using only one core per task) the other one will just add its memory to your job.
If your job requires more than 190000MB / node on Kebnekaise (skylake), there is a limited number of nodes with 3072000MB memory, which you may be allowed to use (you apply for it as a separate resource when you make your project proposal in SUPR). They are accessed by selecting the largemem partition of the cluster. You do this by setting: -p largemem.
Example:
The run/wallclock time (–time, –time-min)
If you know the runtime (wall clock time) of your job, it is beneficial to set this value as accurately as possible.
- Smaller jobs are more likely to fit into slots of unused space faster.
Note: Please add some extra time to account for variances in the system.
- The maximum allowed runtime of any job is seven (7) days.
The format is:
- D-HH:MM:SS (D=Day(s), HH=Hour(s), MM=Minute(s), SS=Second(s))
Example:
You can also use the –time-min option to set a minimum time for your job.
If you use this, Slurm will try to find a slot with more than –time-min and less than –time. This is useful if your job does periodic checkpoints of data and can restart from that point. This technique can be used to fill openings in the system, that no big jobs can fill, and so allows for better throughput of your jobs.
Example:
# Runtime limit 2 days, 12hours
#SBATCH --time 2-12:00:00
#
# Minimum runtime limit 1 days, 12hours
#SBATCH --time-min 1-12:00:00
The number of nodes (-N)
It is possible to set the number of nodes that slurm should allocate for your job.
This should only be used together with –ntasks-per-node or with –exclusive.
But in almost every case it is better to let slurm calculate the number of nodes required for your job, from the number of tasks, the number of cores per task, and the number of tasks per node.
Number of GPUs needed
NOTE
- Your project need to have time on the GPU nodes to use them, as they are considered a separate resource now.
- You do not have to add a specific partition in the job script for the K80s and V100s - you just use the SLURM command mentioned below.
- You do need to add a partition to the job script for the A100s in addition to the SLURM command for requesting cards:
To request GPU resources one has to include a GRES in the submit file. The general format is:
where TYPE-OF-CARD is either k80, v100, or a100 and x = 1, 2, or 4 (4 only for the K80 type).
When requesting two or four K80 cards, one must also use “–exclusive” (this does not apply when requesting V100 cards or A100 cards).
More information about using the GPU resources here.
Sending output to files (–output/–error)
The output (stdout) and error (stderr) output from your program can be collected with the help of the –output and –error options to sbatch.
Example:
# Send stderr of my program into <jobid>.error
#SBATCH --error=%J.error

# Send stdout of my program into <jobid>.output
#SBATCH --output=%J.output
The files in the example will end up in the working directory of you job.
Send mail on job changes (–mail-type)
Slurm can send mail to you when certain event types occur. Valid type values are: BEGIN, END, FAIL, REQUEUE, and ALL (any state change).
Example:
Note: We recommend that you do NOT include a command for the batch system to send an email when the job has finished, particularly if you are running large amounts of jobs. The reason for this is that many mail servers have a limit and may block accounts (or domains) temporarily if they send too many mails. Instead use
or
to see the status of your job(s).
Exclusive (–exclusive)
In some use-cases it is usefull to ask for the complete node (not allowing any other jobs, including your own, to share).
–exclusive can be used with -N (number of nodes) to get all the cores, and memory, on the node(s) exclusively for your job.
Example:
Constraints
If you need to run only on the Broadwell nodes or only on the Skylake nodes, then you can do this with the –constraint flag:
#SBATCH –constraint=broadwell#SBATCH –constraint=skylake
Common programs which have special requirements
Job Submission
There are three ways to run a job with SLURM: command line, job submission file, and interactively.
Command line
A job can simply be submitted from the command line with srun.
Example:
This example asks for exclusive use of two nodes to run the program my_program, and a time limit of 30 minutes. Since the number of tasks has not been specified, it assumes the default of one task per node. Note that the –exclusive parameter guarantees no other jobs will run on the allocated nodes. Without the –exclusive parameter, SLURM would only allocate the minimum assignable resources for each node. The job is run in the project hpc2nXXXX-YYY (change to your own project).
When submitting the job this way, you give all the commands on the command line, and then you wait for the job to pass through the job queue, run, and complete before the shell prompt returns, allowing you to continue typing commands.
This is a good way to run quick jobs and get accustomed to how SLURM works, but it is not the recommended way of running longer programs, or MPI programs; these types of jobs should run as a batch job with a Job Submission File. This also has the advantage of letting you easily see what you did last time you submitted a job.
Job Submission File
Instead of submitting the program directly to SLURM with srun from the command line, you can submit a batch job with sbatch. This has the advantage of you not having to wait for the job to start before you can use your shell prompt.
Before submitting a batch job, you first write a job submission file, which is an executable shell script. It contains all the environment setup, commands and arguments to run your job (other programs, MPI applications, srun commands, shell commands, etc). When your job submission file is ready, you submit it to the job queue with sbatch. sbatch will add your job to the queue, returning immediately so you can continue to use your shell prompt. The job will run when resources become available.
When the job is complete, you will, if not specified otherwise with directives, get a file named slurm-JOBID.out containing the output from your job. This file will be placed in the same directory that you submitted your job from. JOBID will be the id of the job, which is returned when you submitted the job.
The following example submits a job to the default batch partition:
To specify submission to the largemem partition, you add ‘-p largemem’ to the submit script, but only if your project is allowed to run in that partition.
To specify this in your jobscript, you use
Interactive
If you would like to allocate resources on the cluster and then have the flexibility of using those resources in an interactive manner, you can use the command salloc to allow interactive use of resources allocated to your job. This can be useful for debugging, in addition to debugging tools like DDT (which uses normal batch jobs and not interactive allocations).
First, you make a request for resources with salloc, like in this example:
The example above will allocate resources for up to 4 simultaneous tasks for 1 hour and 30 minutes. You need to give your project id as well (change hpc2nXXXX-YYY to your own project id).
Your request enters the job queue just like any other job, and salloc will tell you that it is waiting for the requested resources. When salloc tells you that your job has been allocated resources, you can interactively run programs on those resources with srun for as long as the time you asked for. The commands you run with srun will then be executed on the resources your job has been allocated.
NOTE: After salloc tells you that your job resources have been granted, you are still using a shell on the login node. You must submit all commands with srun to have them run on your job’s allocated resources. Commands run without srun will be executed on the login node.
This is demonstrated the examples below.
1 node, resources for 4 parallel tasks, on a Kebnekaise compute node (change to your own project ID)
b-an01 [~]$ salloc -n 4 --time=1:00:00 -A hpc2nXXXX-YYY
salloc: Pending job allocation 10248860
salloc: job 10248860 queued and waiting for resources
salloc: job 10248860 has been allocated resources
salloc: Granted job allocation 10248860
b-an01 [~]$  echo $SLURM_NODELIST
b-cn0206
b-an01 [~]$ srun hostname
b-cn0206.hpc2n.umu.se
b-cn0206.hpc2n.umu.se
b-cn0206.hpc2n.umu.se
b-cn0206.hpc2n.umu.se
b-an01 [~]$ hostname
b-an01.hpc2n.umu.se
2 nodes, resources for 4 parallel tasks, on Kebnekaise
b-an01 [~]$ salloc -N 2 -n 4 --time=00:10:00 hpc2nXXXX-YYY
salloc: Pending job allocation 10248865
salloc: job 10248865 queued and waiting for resources
salloc: job 10248865 has been allocated resources
salloc: Granted job allocation 10248865
b-an01 [~]$ echo $SLURM_NODELIST
b-cn[0205,0105]
b-an01 [~]$ srun hostname
b-cn0205.hpc2n.umu.se
b-cn0205.hpc2n.umu.se
b-cn0205.hpc2n.umu.se
b-cn0105.hpc2n.umu.se
b-an01 [~]$
Note that SLURM determined where to allocate resources for the 4 tasks on the 2 nodes. In this case, three tasks were run on b-cn0205, and one on b-cn0105. If needed, you can control how many tasks you want to run on each node with –ntask-per-node=NUMBER.
Job status
To see status of partitions and nodes, use
To get the status of all SLURM jobs
To get the status of all your SLURM jobs
where USERNAME is your username.
To only view the jobs in the largemem partition on Kebnekaise
Get the status of an individual job
You get the JOBID either when you submit the job with sbatch, or from checking with squeue -u USERNAME.
Deleting a job
To cancel a job, use scancel. You need the running or pending JOBID. It is only the job’s owner and SLURM administrators that can cancel jobs.
You get the JOBID either when you submit the job with sbatch, or from checking with squeue -u USERNAME.
Example:
Or through squeue
To cancel all your jobs (running and pending) you can run
Alternatively, you can cancel a job submitted by srun or in an interactive shell, with salloc, by pressing Ctrl-C. In the example below, we have asked to start an interactive job, which we then cancel during waiting.
$ salloc -N 2 -n 4
salloc: Pending job allocation 779
salloc: job 779 queued and waiting for resources
^Csalloc: Job allocation 779 has been revoked.
salloc: Job aborted due to signal
Note Do not kill/skill srun to cancel a SLURM job! Doing so only terminates srun. The tasks continue to run, but not under SLURM management. If you do kill/skill an srun job, you can use squeue to get the JOBID and then either scancel the job, or use srun -p PARTITION -a JOBID -j, to reattach srun to the job and then you can use Ctrl-C to cancel it.
Job dependencies - SLURM
A job can be given the constraint that it only starts after another job has finished.
In the following example, we have two Jobs, A and B. We want Job B to start after Job A has successfully completed.
First we start Job A (with submit file jobA.sh) by submitting it via sbatch:
Making note of the assigned job-id for Job A (JOBID-JobA), we then submit Job B (with submit file jobB.sh) with the added condition that it only starts after Job A has successfully completed:
If we want Job B to start after several other Jobs have completed, we can specify additional jobs, using a ‘:’ as a delimiter:
We can also tell slurm to run Job B, even if Job A fails, like so:
For more information, consult the man page for sbatch.
Job arrays - SLURM
Job arrays in SLURM lets you run many jobs with the same job script. If you have many data files that you would normally have processed in multiple jobs, job arrays could be an alternative way to instead generate many job scripts for each run and submit it one by one.
Example
Job arrays are only supported for batch jobs and the array index values are specified using the –array or -a option of the sbatch command. The option argument can be specific array index values, a range of index values, and an optional step size (see next examples).
Note that the minimum index value is zero and the maximum value is a Slurm configuration parameter (MaxArraySize minus one). Jobs which are part of a job array will have the environment variable SLURM_ARRAY_TASK_ID set to its array index value.
Example
Example
Tips, SLURM
A short list of tips and suggestions for using the batch system.
Job status
In order to see your jobs only, and no others, run
Interactive running
Using salloc, you get an interactive shell to run your jobs in, when your nodes are allocated. This works like an interactive shell (-I) does in PBS - including the fact that you cannot use the window while you wait for - perhaps - a long time before the job starts.
You MUST use srun to run anything on the nodes you allocate with salloc. The shell you are standing in is still on the login node, and if you do not use srun, you just run on that node. This is potentially very disruptive since the login node can get slowed down a lot, for everyone. Thus, you should always use srun! Run with
General hints
- Remember, in SLURM, your batch job starts to run in the directory from which you submitted the script. This means you do NOT have to change to that directory like you do in PBS systems.
- Per default, SLURM may place other jobs/tasks - both your own and others - on the node(s) you are using. It is possible to ask for the entire node, and since SLURM does not separate between your own jobs and the jobs of others, this means the node will also not be shared between your own tasks. This is useful if you, say, need the whole infiniband bandwidth, or all the memory on the node. However, remember that if you allocate the entire node for yourself, even if you only run on one or two cores, then you will still be ‘charged’ for a whole node from your project allocation, so only do this if you actually need it! The command to add to your submit file to do this is
#SBATCH –exclusive. -
We strongly recommend that you do NOT include a command for the batch system to send an email when the job has finished, particularly if you are running large amounts of jobs. The reason for this is that many mail servers have a limit and may block accounts (or domains) temporarily if they send too many mails. Instead use
or to see the status of your job(s). -
In some situations, a job may die unexpectedly, for instance if a node crashes. At HPC2N SLURM has been configured NOT to requeue and restart jobs automatically. If you do want your job to requeue, add the command
to your submit script. - The command
sacctmgrcan, with the right flags, give a lot of useful information. sacctcan be used to get info on use of memory and other resources for a jobs.
Example- The smallest allocatable unit on Kebnekaise is a single core.
- You must give a project account number for the job to be accepted by the job scheduler. There is no default partition.
- If you see your job is in the state
ReqNodeNotAvail, it is usually because there is a maintenance window scheduled and your job would overlap that period. Check the System News to see if there is a maintenance window scheduled! As soon as the service is done, the reservation is released and the job should start as normal. - If your job is pending and with
“Reason=AssociationResourceLimit”or“Reason=AssocMaxCpuMinutesPerJobLimit”, it is because your currently running jobs allocates your entire footprint allowance for your project. The job will start when enough of your running jobs have finished that you are below the limit.- Another possibility is that your job is requesting more resources (more core hours) than your allocation permits. Remember: CORES-REQUESTED x WALLTIME = CORE-HOURS-YOU-ARE-REQUESTING.
- On Kebnekaise, if you are asking for more than 28 cores, you are accounted for a whole number of nodes, rounded up (Ex. 29 cores -> 2 nodes).
- If you are running an MPI code, then you need to use
sreportis useful for getting information about many things, for instance the usage of users in a project. The example below gives usage per user, for a period given with ‘start’ and ‘end’, for the project with account number hpc2nXXXX-YYY (accounts can be of the form hpc2nXXXX-YYY, snicXXX-YY-ZZ, naissXXXX-YY-ZZ). Note: the letters in the account number must be given in lower case!- The default stack limit on Kebnekaise s now unlimited by default, and you no longer need to use the flag
–propagate=STACKtosrun. - You access the GPU nodes on Kebnekaise with
where CARD = k80, v100, or a100 and x = 1, 2, or 4 (4 only for k80s). More information in the SLURM GPU Resources section.
- NOTE: your project need to have time on the GPU nodes to use them, as they are considered a separate resource now. For K80s and V100s you do not have to add a specific partition in the job script, as it is handled through the above SLURM command. For A100s you need to add
#SBATCH -p amd_gpu.
- NOTE: your project need to have time on the GPU nodes to use them, as they are considered a separate resource now. For K80s and V100s you do not have to add a specific partition in the job script, as it is handled through the above SLURM command. For A100s you need to add
Environment variables
SLURM provides several environment variables which can be put to use in your submit script.
This is some of the more commonly used ones:
- $SLURM_JOB_ID: Job ID
- $SLURM_JOB_NODELIST: Nodes assigned to job
- $SLURM_SUBMIT_DIR: Submit Directory
- $SLURM_NNODES: Total number of nodes in the job’s resource allocation.
For a full list of available variables, see the SBATCH man page, section titled ‘OUTPUT ENVIRONMENT VARIABLES’.
SLURM_JOB_NODELIST
This variable provides a list of nodes that are allocated to your job. The nodes are listed in a compact form, for example ‘b-cn[0211,0216-0217]’ which specifies the nodes:
NOTE that the variable is only accessible on the node(s) that the job is running on, so you either have to give the below commands within the submit script or run an interactive job and then preface with srun as below.
This list can be manipulated in various ways by the ‘hostlist’ command. Let’s assume the above listed nodes in the SLURM_JOB_NODELIST variable and look at several examples:
For a full list of hostlist options, type:
Expiring projects
If you have jobs still in the queue when your project expires, your jobwill not be removed, but they will not start to run.
You will have to remove them yourself, or, if you have a new project, you can change the project account for the job with this command
Basic examples of job submission files
The examples below generally assume you are submitting the job from the same directory your program is located in - otherwise you need to give the full path.
Submit with: sbatch MYJOB.sh, where MYJOB.sh is whatever name you gave your submit script.
Remember - the submission files/scripts and all programs called by them, must be executable!
The project ID hpc2nXXXX-YYY is used in the examples. Please replace it with your own project ID.
Serial jobs
Serial job on Kebnekaise, compiler toolchain ’foss/2021b’
Running two executables per node (two serial jobs)
#!/bin/bash
#SBATCH -A hpc2nXXXX-YYY
#SBATCH -n 2
#SBATCH --time=00:30:00

# Clear the environment from any previously loaded modules
module purge > /dev/null 2>&1

# Load the module environment suitable for the job - here foss/2021b
module load foss/2021b

# Use '&' to start the first job in the background
srun -n 1 ./job1 &
srun -n 1 ./job2

# Use 'wait' as a barrier to collect both executables when they are done. If not the batch job will finish when the job2.batch program finishes and kill job1.batch if it is still running.
wait
The scripts job1 and job2 could be any script or executable that is a serial code. The drawback with this examnple is that any output from job1 or job2 will get mixed up in the batch jobs output file. You can handle this by naming th eoutput for each of the jobs or by job1 and job2 being programs that create output to file directly.
Running two executables per node (two serial jobs) - separate output files
#!/bin/bash
#SBATCH -A hpc2nXXXX-YYY
#SBATCH -n 2
#SBATCH --time=00:30:00

# Clear the environment from any previously loaded modules
module purge > /dev/null 2>&1

# Load the module environment suitable for the job - here foss/2021b
module load foss/2021b

# Use '&' to start the first job in the background
srun -n 1 ./job1 > myoutput1 2>&1 &
srun -n 1 ./job2 > myoutput2 2>&1

# Use 'wait' as a barrier to collect both executables when they are done. If not the batch job will finish when the job2.batch program finishes and kill job1.batch if it is still running.
wait
Naming output/error files. Serial program
#!/bin/bash
#SBATCH -A hpc2nXXXX-YYY
#SBATCH -n 1
#SBATCH --time=00:05:00
#SBATCH --error=job.%J.err
#SBATCH --output=job.%J.out

# Clear the environment from any previously loaded modules
module purge > /dev/null 2>&1

# Load the module environment suitable for the job - here foss/2021b
module load foss/2021b

# And finally run the job
./my_program
Normally, SLURM produces one output file called slurm-JOBID.out containing the combined standard output and errors from the run (though files created by the program itself will of course also be created). If you wish to rename the output and error files, and get them in separate files, you can do something similar to this example.
Using the environment variable %J (contains the JOBID) in your output/error files will ensure you get unique files with each run and so avoids getting the files overwritten.
OpenMP jobs
This example shows a 28 core OpenMP Job (maximum size for one normal node on Kebnekaise).
#!/bin/bash
# Example with 28 cores for OpenMP
#
# Project/Account - change to your own
#SBATCH -A hpc2nXXXX-YYY
#
# Number of cores
#SBATCH -c 28
#
# Runtime of this jobs is less then 12 hours.
#SBATCH --time=12:00:00
#
# Clear the environment from any previously loaded modules
module purge > /dev/null 2>&1

# Load the module environment suitable for the job - here foss/2021b
module load foss/2021b

# Set OMP_NUM_THREADS to the same value as -c
# with a fallback in case it isn't set.
# SLURM_CPUS_PER_TASK is set to the value of -c, but only if -c is explicitly set
if [ -n "$SLURM_CPUS_PER_TASK" ]; then
   omp_threads=$SLURM_CPUS_PER_TASK
else
omp_threads=1
fi
export OMP_NUM_THREADS=$omp_threads

./openmp_program
If you wanted to run the above job, but only use some of the cores for running on (to perhaps use more memory than what is available on 1 core), you can submit with
MPI jobs
MPI job on Kebnekaise, compiler toolchain ’foss/2021b’
#!/bin/bash
#SBATCH -A hpc2nXXXX-YYY
#SBATCH -n 14
#SBATCH --time=00:05:00
##SBATCH --exclusive

module purge > /dev/null 2>&1
ml foss/2021b

srun ./my parallel program
The –exclusive flag means your job will not share the node with any other job (including your own). It is commented out in the above example, but you can remove one of the # to activate it if you, for instance, need the entire bandwidth of the node. Note that this will mean 1) it will likely take longer for the job to start as you need to wait until a full node is available 2) your project will be accounted (time) for the entire node.
Output from the above MPI job on Kebnekaise, run on 14 cores
Note: 14 cores is one NUMA island
b-an01 [~/slurm]$ cat slurm-15952.out
The following modules were not unloaded:
(Use "module --force purge" to unload all):
1) systemdefault 2) snicenvironment
Processor 12 of 14: Hello World!
Processor 5 of 14: Hello World!
Processor 9 of 14: Hello World!
Processor 4 of 14: Hello World!
Processor 11 of 14: Hello World!
Processor 13 of 14: Hello World!
Processor 0 of 14: Hello World!
Processor 1 of 14: Hello World!
Processor 2 of 14: Hello World!
Processor 3 of 14: Hello World!
Processor 6 of 14: Hello World!
Processor 7 of 14: Hello World!
Processor 8 of 14: Hello World!
Processor 10 of 14: Hello World!
MPI job on Kebnekaise, compiler toolchain ’foss/2021b’ and more memory
#!/bin/bash
#SBATCH -A hpc2nXXXX-YYY
#SBATCH -N 2
#SBATCH --time=00:05:00
#SBATCH --exclusive
# This job example needs 8GB of memory per mpi-task (=mpi ranks, =cores)
# and since the amount of memory on the regular Broadwell nodes is
# 4500MB per core, when using all 28 cores we have to use 2 nodes and
# only half the cores
#SBATCH -c 2

module purge > /dev/null 2>&1
ml foss/2021b

srun ./my parallel program
The –exclusive flag means your job will not share the node with any other job (including your own). It is commented out in the above example, but you can remove one of the # to activate it if you, for instance, need the entire bandwidth of the node. Using –exclusive also ensures that all the cores on the node will be available to the job so you could use the memory from all of them for instance.
Note that using this flag will mean 1) it will likely take longer for the job to start as you need to wait until a full node is available 2) your project will be accounted (time) for the entire node.
Running fewer MPI tasks than the cores you have available
#!/bin/bash
# Account name to run under
#SBATCH -A hpc2nXXXX-YYY
# Give a sensible name for the job
#SBATCH -J my_job_name
# ask for 4 full nodes
#SBATCH -N 4
#SBATCH --exclusive
# ask for 1 day and 3 hours of run time
#SBATCH -t 1-03:00:00

# Clear the environment from any previously loaded modules
module purge > /dev/null 2>&1

# Load the module environment suitable for the job - here foss/2021b
module load foss/2021b

# run only 1 MPI task/process on a node, regardless of how many cores the nodes have.
srun -n 4 --ntasks-per-node=1 ./my_mpi_program
Hybrid MPI/OpenMP jobs
This example shows a hybrid MPI/OpenMP job with 4 tasks and 28 cores per task.
#!/bin/bash
# Example with 4 tasks and 28 cores per task for MPI+OpenMP
#
# Project/Account - change to your own
#SBATCH -A hpc2nXXXX-YYY
#
# Number of MPI tasks
#SBATCH -n 4
#
# Number of cores per task
#SBATCH -c 28
#
# Runtime of this job example is less then 12 hours.
#SBATCH --time=12:00:00
#
# Clear the environment from any previously loaded modules
module purge > /dev/null 2>&1

# Load the module environment suitable for the job - here foss/2021b
module load foss/2019a

# Set OMP_NUM_THREADS to the same value as -c
# with a fallback in case it isn't set.
# SLURM_CPUS_PER_TASK is set to the value of -c, but only if -c is explicitly set
if [ -n "$SLURM_CPUS_PER_TASK" ]; then
   omp_threads=$SLURM_CPUS_PER_TASK
else
   omp_threads=1
fi
export OMP_NUM_THREADS=$omp_threads

# Running the program
srun --cpu_bind=cores ./mpi_openmp_program
Multiple jobs
This section show examples of starting multiple jobs within the same submit file.
Starting more than one serial job in the same submit file
#!/bin/bash
#SBATCH -A hpc2nXXXX-YYY
#SBATCH -n 5
#SBATCH --time=00:15:00

module purge > /dev/null 2>&1
ml foss/2021b

srun -n 1 ./job1.batch &
srun -n 1 ./job2.batch &
srun -n 1 ./job3.batch &
srun -n 1 ./job4.batch &
srun -n 1 ./job5.batch
wait
All the jobs are serial jobs, and as they are started at the same time, you need to make sure each has a core to run on. The time you ask for must be long enough that even the longest of the jobs have time to finish. Remember the wait at the end. If you do not include this, then the batch job will finish when the first of the jobs finishes instead of waiting for all to finish. Alsi notice the & at the end of each command to run a job.
Multiple Parallel Jobs Sequentially
#!/bin/bash
#SBATCH -A hpc2nXXXX-YYY
#SBATCH -c 28
# Remember to ask for enough time for all jobs to complete
#SBATCH --time=02:00:00

module purge > /dev/null 2>&1
ml foss/2021b

srun -n 14 ./a.out
srun -n 14 -c 2 ./b.out
srun -n 28 ./c.out
Here the jobs are parallel, but they run sequentially which means that you only need enough cores that you have enough for the job that uses the most cores. In this example, the first uses 14, the second 28 (because each task uses 2 cores), the third uses 28. So you need 28 here.
We assume the programs a.out, b.out, and c.out all generate their own output files. Otherwise the output will go to the slurm-JOBID.out file.
Note: -n tasks per default uses 1 core per task, unless you use -c to say you want more cores per task.
Multiple Parallel Jobs Sequentially with named output copied elsewhere
#!/bin/bash
#SBATCH -A hpc2nXXXX-YYY
#SBATCH -c 28
# Remember to ask for enough time for all jobs to complete
#SBATCH --time=02:00:00

module purge > /dev/null 2>&1
ml foss/2021b

srun -n 14 ./a.out > myoutput1 2>&1
cp myoutput1 /proj/nobackup/MYSTORAGE/mydatadir
srun -n 14 -c 2 ./b.out > myoutput2 2>&1
cp myoutput2 /proj/nobackup/MYSTORAGE/mydatadir
srun -n 28 ./c.out > myoutput3 2>&1
cp myoutput3 /proj/nobackup/MYSTORAGE/mydatadir
Here the jobs we run and the needed cores and tasks are the same as in the example above, but the output of each one is handled in the script, sending it to a specific output file.
In addition, this example also shows how you can copy the output to somewhere else (the directory mydatadir located under your project storage which here is called MYSTORAGE).
Multiple Parallel Jobs Simultaneously
#!/bin/bash
#SBATCH -A hpc2nXXXX-YYY
# Total number of cores the jobs need
#SBATCH -n 56
#SBATCH --time=02:00:00

module purge > /dev/null 2>&1
ml foss/2021b

srun -n 14 --cpu bind=cores --exclusive ./a.out &
srun -n 28 --cpu bind=cores --exclusive ./b.out &
srun -n 14 --cpu bind=cores --exclusive ./c.out &
wait
In this example I am starting 3 jobs within the same jobs. You can put as many as you want, of course. Make sure you ask for enough cores that all jobs can run at the same time, and have enough memory. Of course, this will also work for serial jobs - just remove the srun from the command line.
Remember to ask for enough time for all of the jobs to complete, even the longest.